 Join Slack
Installing HA Netris Controller in Air-Gapped Environments
Why Air-Gapped Installation?
In many production or regulated environments, network connectivity is tightly restricted for security or compliance reasons. An air-gapped environment prevents unauthorized external access and ensures no reliance on external artifact repositories. All required components—binaries, container images, and Helm charts—are transferred manually (e.g., via USB, secure copy) and installed entirely offline. This approach:
Enhances Security by limiting the potential attack surface.
Ensures Consistency of the software stack across multiple deployments.
Complies with strict regulatory standards where internet access may be disallowed.
Why a High Availability (HA) Cluster?
Running Netris Controller on a high availability (HA) cluster provides resilience against hardware or software failures. By deploying multiple control-plane nodes, each with redundant services, the cluster can tolerate node downtime without losing critical functionality. Benefits include:
Redundancy: No single point of failure in the control plane or the critical components of Netris Controller.
Scalability: Workloads can be spread across multiple nodes, easing resource constraints.
Reliability: Uninterrupted operation even during maintenance or unexpected issues on a node.
Prerequisites
Three Servers in the same private network, each meeting the minimum hardware requirements for K3S and Netris Controller.
Two Virtual IP Addresses (VIPs) and an IP address for each controller node available on that network:
KubeAPI VIP (e.g., 192.168.0.40/32)
Netris Controller VIP (e.g., 192.168.0.50/32)
- Example IP Assignments
Node addresses:
192.168.0.1/24 – node1
192.168.0.2/24 – node2
192.168.0.3/24 – node3
KubeAPI VIP: 192.168.0.40/32
Netris Controller VIP: 192.168.0.50/32
Warning
Stable node IP addresses. Assign each controller node a fixed IP address — statically on the node (recommended) or by DHCP reservation. K3S and the cluster overlay network bind to the node addresses present during installation, and the cluster does not recover on its own if those addresses change.
For example, a node whose default route is reached through a dynamically addressed interface builds the cluster overlay on that address. After a reboot or a power outage, the interface comes up with a different address and the Kubernetes cluster breaks.
Default Gateway configured on each server. If no default route exists, add a dummy route or black-hole route to satisfy K3S requirements.
Air-Gapped Artifacts. You have the complete set of binaries, container images, Helm charts, CRDs, and manifests in the
netris-controller-ha/folder.Firewall Rules: The following ports must be open between all three nodes to ensure proper K3S cluster functionality:
Protocol
Port
Description
TCP
2379-2380
Required only for HA with embedded etcd
TCP
6443
K3S supervisor and Kubernetes API Server
UDP
8472
Required only for Flannel VXLAN
TCP
10250
Kubelet metrics
Root privileges. Run these procedures as root or as a user with root privileges. I.e., add
username ALL=(ALL:ALL) ALLto yoursudoersfile.
Warning
CPU AVX Instruction Support Required: MongoDB requires CPUs with AVX instruction set support. This is commonly missing in virtualized environments (KVM/Proxmox/VMware VMs). Check AVX support before installation:
cat /proc/cpuinfo | grep avx
If it returns no output, enable AVX support before proceeding.
Obtain the Installation File
Contact Netris to acquire the air-gapped installation package, named netris-controller-ha-v4.x.x.tar.gz. This package contains everything you need for an HA deployment of Netris Controller on K3S without internet connectivity.
Steps to Install
1. Preparing Each Node
1.1 Transfer the File to the Servers
Use a secure copy method (e.g., SCP, USB drive) to move the netris-controller-ha-v4.x.x.tar.gz file to all three target nodes running Ubuntu 24.04 or RHEL 9.8.
1.2 Extract the Tarball
Once the file is on the servers, extract its contents:
tar -xzvf netris-controller-ha-v4.x.x.tar.gz
This will create a folder containing all necessary scripts, binaries, images, Helm charts, CRDs, and manifests.
2. Install K3S on All Nodes
2.1 Load K3S Binaries and Images
On all three nodes, run the following commands to prepare a local K3s installation:
sudo mkdir -p /var/lib/rancher/k3s/agent/images/

# Copy air-gapped images
sudo cp files/k3s/k3s-airgap-images-amd64.tar.zst /var/lib/rancher/k3s/agent/images/k3s-airgap-images-amd64.tar.zst

# Copy K3s, Helm, and k9s executables
sudo cp files/k3s/k3s /usr/local/bin/k3s && sudo chmod +x /usr/local/bin/k3s
sudo cp files/k3s/helm /usr/local/bin/helm && sudo chmod +x /usr/local/bin/helm
sudo cp files/k3s/k9s /usr/local/bin/k9s && sudo chmod +x /usr/local/bin/k9s

# Make the installation script executable
sudo chmod +x install-k3s.sh
2.2 Initialize the First Node
On the first node:
Replace 192.168.0.40 with your Kubernetes API VIP.
Specify a secure token for K3S_TOKEN=SECRET:
K3S_TOKEN=SECRET \
INSTALL_K3S_VERSION=v1.31.5+k3s1 \
INSTALL_K3S_SKIP_DOWNLOAD=true \
K3S_KUBECONFIG_MODE="644" \
INSTALL_K3S_EXEC='server --cluster-init --tls-san 192.168.0.40 --disable=traefik --disable=servicelb' \
./install-k3s.sh
Wait approximately a minute, then check the system pods:
kubectl -n kube-system get pods
All pods should be in a Running or Completed state.
2.3 Join the Second and Third Nodes
On the second and third nodes, update the IPs to match your environment:
K3S_TOKEN=SECRET \
INSTALL_K3S_VERSION=v1.31.5+k3s1 \
INSTALL_K3S_SKIP_DOWNLOAD=true \
K3S_KUBECONFIG_MODE="644" \
INSTALL_K3S_EXEC='server --server https://192.168.0.1:6443 --tls-san 192.168.0.40 --disable=traefik --disable=servicelb' \
./install-k3s.sh
Replace 192.168.0.1:6443 with the first node’s IP and port.
Keep 192.168.0.40 as your KubeAPI VIP.
Confirm on the first node that all three nodes have joined:
kubectl get node
3. Import Necessary Container Images
On all three nodes, import container images:
Decompress the images archive:
gunzip -f images.tar.gz
Import them:
sudo ctr images import images.tar
4. Configure kube-vip for KubeAPI High Availability
On the first node only, open kube-vip.yaml:
vim kube-vip.yaml
Scroll to the bottom; you will see the
addressandvip_interfacevariables. Edit them:
address: replace192.168.0.40with your KubeAPI VIP.
vip_interface: specify your network interface where 192.168.0.1 is located. (e.g.,bond0).
Apply the file:
kubectl apply -f kube-vip.yaml
Ensure three kube-vip pods are running:
kubectl -n kube-system get pods -l app.kubernetes.io/name=kube-vip-ds
Check VIP reachability (ping from all nodes):
ping 192.168.0.40
5. Add Helm Chart Packages to K3S
Copy your Helm charts to the K3S static files directory on all three nodes:
sudo cp files/charts/* /var/lib/rancher/k3s/server/static/charts/
You can now perform kubectl or helm commands from any node or a remote machine (after adjusting kubeconfig to point to the VIP).
6. Verify and Scale Core K3S Components
Check the pods in the cluster:
kubectl get pods -A
Scale key default components to three replicas for redundancy:
kubectl -n kube-system scale deploy/local-path-provisioner --replicas=3
kubectl -n kube-system scale deploy/coredns --replicas=3
kubectl -n kube-system scale deploy/metrics-server --replicas=3
Confirm they have scaled:
kubectl get pods -A
7. Deploy Kube-VIP Cloud Controller
We need a second VIP for the Netris Controller load balancer.
On the first node only, open manifests/kube-vip-cloud-controller.yaml:
vim manifests/kube-vip-cloud-controller.yaml
Locate the ConfigMap and change cidr-global from 192.168.0.50/32 to your planned controller VIP.
Apply:
kubectl apply -f manifests/kube-vip-cloud-controller.yaml
Verify three pods are running:
kubectl -n kube-system get pods -l component=kube-vip-cloud-provider
8. Deploy North-South controller VIP (optional)
Tip
The North-South VIP is optional and can be configured later. The North-South VIP typically provides access to the Netris API and ZTP functionality for endpoints connected to the North-South fabric.
Set vip_interface in
manifests/kube-vip-ns.yaml(North-South NIC name)On the first node only, apply
kubectl apply -f manifests/kube-vip-ns.yaml
Set cidr-global in manifests/kube-vip-ns-cloud-controller.yaml (North-South VIP address)
Apply it
kubectl apply -f manifests/kube-vip-ns-cloud-controller.yaml
9. Deploy the Netris Controller
9.1 Install the MariaDB Operator
CRDs:
kubectl apply -f manifests/netris-controller/mariadb-operator-crds.yaml
Namespace:
kubectl apply -f manifests/netris-controller/ns.yaml
Operator:
kubectl apply -f manifests/netris-controller/mariadb-operator-hc.yaml
Check status:
kubectl get pods -n netris-controller
Expected output:
NAME                                                              READY   STATUS      RESTARTS   AGE
helm-install-netris-controller-ha-mariadb-operator-sgcn9          0/1     Completed   0          90s
netris-controller-ha-mariadb-operator-6d49f86bd6-dlf6j            1/1     Running     0          88s
netris-controller-ha-mariadb-operator-6d49f86bd6-gqz45            1/1     Running     0          88s
netris-controller-ha-mariadb-operator-6d49f86bd6-lqjhx            1/1     Running     0          89s
netris-controller-ha-mariadb-operator-cert-controller-79c42dcqh   1/1     Running     0          87s
netris-controller-ha-mariadb-operator-cert-controller-79c44v4tv   1/1     Running     0          89s
netris-controller-ha-mariadb-operator-cert-controller-79c4q9l2g   1/1     Running     0          87s
netris-controller-ha-mariadb-operator-webhook-9b6dcd979-2jtr6     1/1     Running     0          88s
netris-controller-ha-mariadb-operator-webhook-9b6dcd979-56pxp     1/1     Running     0          89s
netris-controller-ha-mariadb-operator-webhook-9b6dcd979-cz5cs     1/1     Running     0          88s
Wait until all pods are ready and in a running or completed state.
9.2 Install Netris Controller
Helm chart manifest:
./netris install
Wait 5–10 minutes for all pods to initialize.
Check:
kubectl get pods -n netris-controller
Look for multiple pods in Running and Completed states (e.g., mariadb, mongodb, redis, web-service, “initdb” jobs, etc.).
Expected output
NAME                                                              READY   STATUS      RESTARTS   AGE
helm-install-netris-controller-ha-mariadb-operator-sgcn9          0/1     Completed   0          4m45s
helm-install-netris-controller-ha-r7brz                           0/1     Completed   0          116s
netris-controller-ha-equinix-metal-agent-74fc8647b5-6wcck         1/1     Running     0          110s
netris-controller-ha-graphite-0                                   1/1     Running     0          112s
netris-controller-ha-graphite-1                                   1/1     Running     0          99s
netris-controller-ha-graphite-2                                   1/1     Running     0          85s
netris-controller-ha-grpc-5f88c9649b-b6csb                        1/1     Running     0          106s
netris-controller-ha-grpc-5f88c9649b-jrvbl                        1/1     Running     0          108s
netris-controller-ha-grpc-5f88c9649b-pdzdw                        1/1     Running     0          106s
netris-controller-ha-mariadb-0                                    1/1     Running     0          82s
netris-controller-ha-mariadb-1                                    1/1     Running     0          82s
netris-controller-ha-mariadb-2                                    1/1     Running     0          82s
netris-controller-ha-mariadb-ha-0                                 1/1     Running     0          111s
netris-controller-ha-mariadb-ha-1                                 1/1     Running     0          109s
netris-controller-ha-mariadb-ha-2                                 1/1     Running     0          109s
netris-controller-ha-mariadb-operator-6d49f86bd6-dlf6j            1/1     Running     0          4m43s
netris-controller-ha-mariadb-operator-6d49f86bd6-gqz45            1/1     Running     0          4m43s
netris-controller-ha-mariadb-operator-6d49f86bd6-lqjhx            1/1     Running     0          4m44s
netris-controller-ha-mariadb-operator-cert-controller-79c42dcqh   1/1     Running     0          4m42s
netris-controller-ha-mariadb-operator-cert-controller-79c44v4tv   1/1     Running     0          4m44s
netris-controller-ha-mariadb-operator-cert-controller-79c4q9l2g   1/1     Running     0          4m42s
netris-controller-ha-mariadb-operator-webhook-9b6dcd979-2jtr6     1/1     Running     0          4m43s
netris-controller-ha-mariadb-operator-webhook-9b6dcd979-56pxp     1/1     Running     0          4m44s
netris-controller-ha-mariadb-operator-webhook-9b6dcd979-cz5cs     1/1     Running     0          4m43s
netris-controller-ha-mongodb-0                                    1/1     Running     0          112s
netris-controller-ha-mongodb-1                                    1/1     Running     0          96s
netris-controller-ha-mongodb-2                                    1/1     Running     0          81s
netris-controller-ha-phoenixnap-bmc-agent-64c75f8598-hjvzj        1/1     Running     0          113s
netris-controller-ha-redis-node-0                                 2/2     Running     0          112s
netris-controller-ha-redis-node-1                                 2/2     Running     0          86s
netris-controller-ha-redis-node-2                                 2/2     Running     0          57s
netris-controller-ha-smtp-5f789dbb58-xr4cx                        1/1     Running     0          111s
netris-controller-ha-telescope-7696d94694-qrszj                   1/1     Running     0          112s
netris-controller-ha-telescope-notifier-7b59777b8-wp89p           1/1     Running     0          107s
netris-controller-ha-web-service-backend-67999c5699-bdcp8         1/1     Running     0          111s
netris-controller-ha-web-service-backend-67999c5699-gbwr4         1/1     Running     0          107s
netris-controller-ha-web-service-backend-67999c5699-h5hgb         1/1     Running     0          107s
netris-controller-ha-web-service-frontend-74d978fd67-9ptvj        1/1     Running     0          108s
netris-controller-ha-web-service-frontend-74d978fd67-dtbpn        1/1     Running     0          105s
netris-controller-ha-web-service-frontend-74d978fd67-jnbqr        1/1     Running     0          105s
netris-controller-ha-web-session-generator-fc4c64597-dlssj        1/1     Running     0          108s
netris-controller-ha-web-session-generator-fc4c64597-g2ghs        1/1     Running     0          113s
netris-controller-ha-web-session-generator-fc4c64597-rbf2s        1/1     Running     0          109s
netris-controller-initdb-00-xcaas-ssbtq                           0/1     Completed   0          78s
netris-controller-initdb-01-tenants-crjzg                         0/1     Completed   0          73s
netris-controller-initdb-01-users-79phr                           0/1     Completed   0          68s
netris-controller-initdb-02-permissions-sxhj4                     0/1     Completed   0          63s
netris-controller-initdb-02-port-5m9kg                            0/1     Completed   0          63s
netris-controller-initdb-02-vpc-j65lp                             0/1     Completed   0          63s
netris-controller-initdb-03-global-settings-2d5lk                 0/1     Completed   0          63s
netris-controller-initdb-04-currency-srpwl                        0/1     Completed   0          63s
netris-controller-initdb-04-whitelist-mmtsj                       0/1     Completed   0          63s
netris-controller-initdb-05-auth-schemes-fqrxf                    0/1     Completed   0          63s
netris-controller-initdb-05-supported-platforms-wfht4             0/1     Completed   0          63s
netris-controller-initdb-06-mon-thresholds-z4pw8                  0/1     Completed   0          63s
netris-controller-initdb-06-nos-list-cdhwj                        0/1     Completed   0          63s
netris-controller-initdb-07-inventory-profiles-9hkgp              0/1     Completed   0          63s
netris-controller-initdb-07-vpn-scores-sgv6n                      0/1     Completed   0          63s
netris-controller-initdb-09-dhcp-option-set-jq7wl                 0/1     Completed   0          58s
10. Set Up the Local Netris Repository
The Netris Local Repository is essential for environments where switches, softgates, or other infrastructure devices don’t have direct internet access. By setting up a local repository, you ensure that these devices can still download necessary packages and updates through a local APT repository
Deploy local repo manifests:
kubectl apply -f manifests/netris-controller/local-repo.yaml
Confirm the pods are running:
kubectl -n netris-controller get pods -l app.kubernetes.io/instance=netris-local-repo
On all three nodes, copy the repository files into the Persistent Volume:
export PVC_PATH=$(kubectl get pv $(kubectl get pvc staticsite-$(kubectl -nnetris-controller get pod -l app.kubernetes.io/instance=netris-local-repo --field-selector spec.nodeName=$(hostname | tr '[:upper:]' '[:lower:]') --no-headers -o custom-columns=":metadata.name") -n netris-controller -o jsonpath="{.spec.volumeName}") -o jsonpath="{.spec.local.path}")

sudo cp -r files/repo ${PVC_PATH}
11. Validate Your Deployment
Access the Netris Controller via https://192.168.0.50 (or your assigned FQDN).
Confirm all services (web service, GRPC, Redis, DBs) are running:
kubectl -n netris-controller get pods
Check cluster health:
kubectl get pods -A
kubectl get nodes
All nodes should be Ready; all pods should be Running or Completed.
Congratulations! You have successfully deployed a highly available, air-gapped Netris Controller on a three-node K3S cluster.
After Installation
The air-gapped Netris Controller also includes a local repository/registry. This repository provides all the necessary packages and images for installing various types of Netris agents.
Enable the Local repository in the Netris Controller Web UI under the Settings section (as shown in the screenshots below).
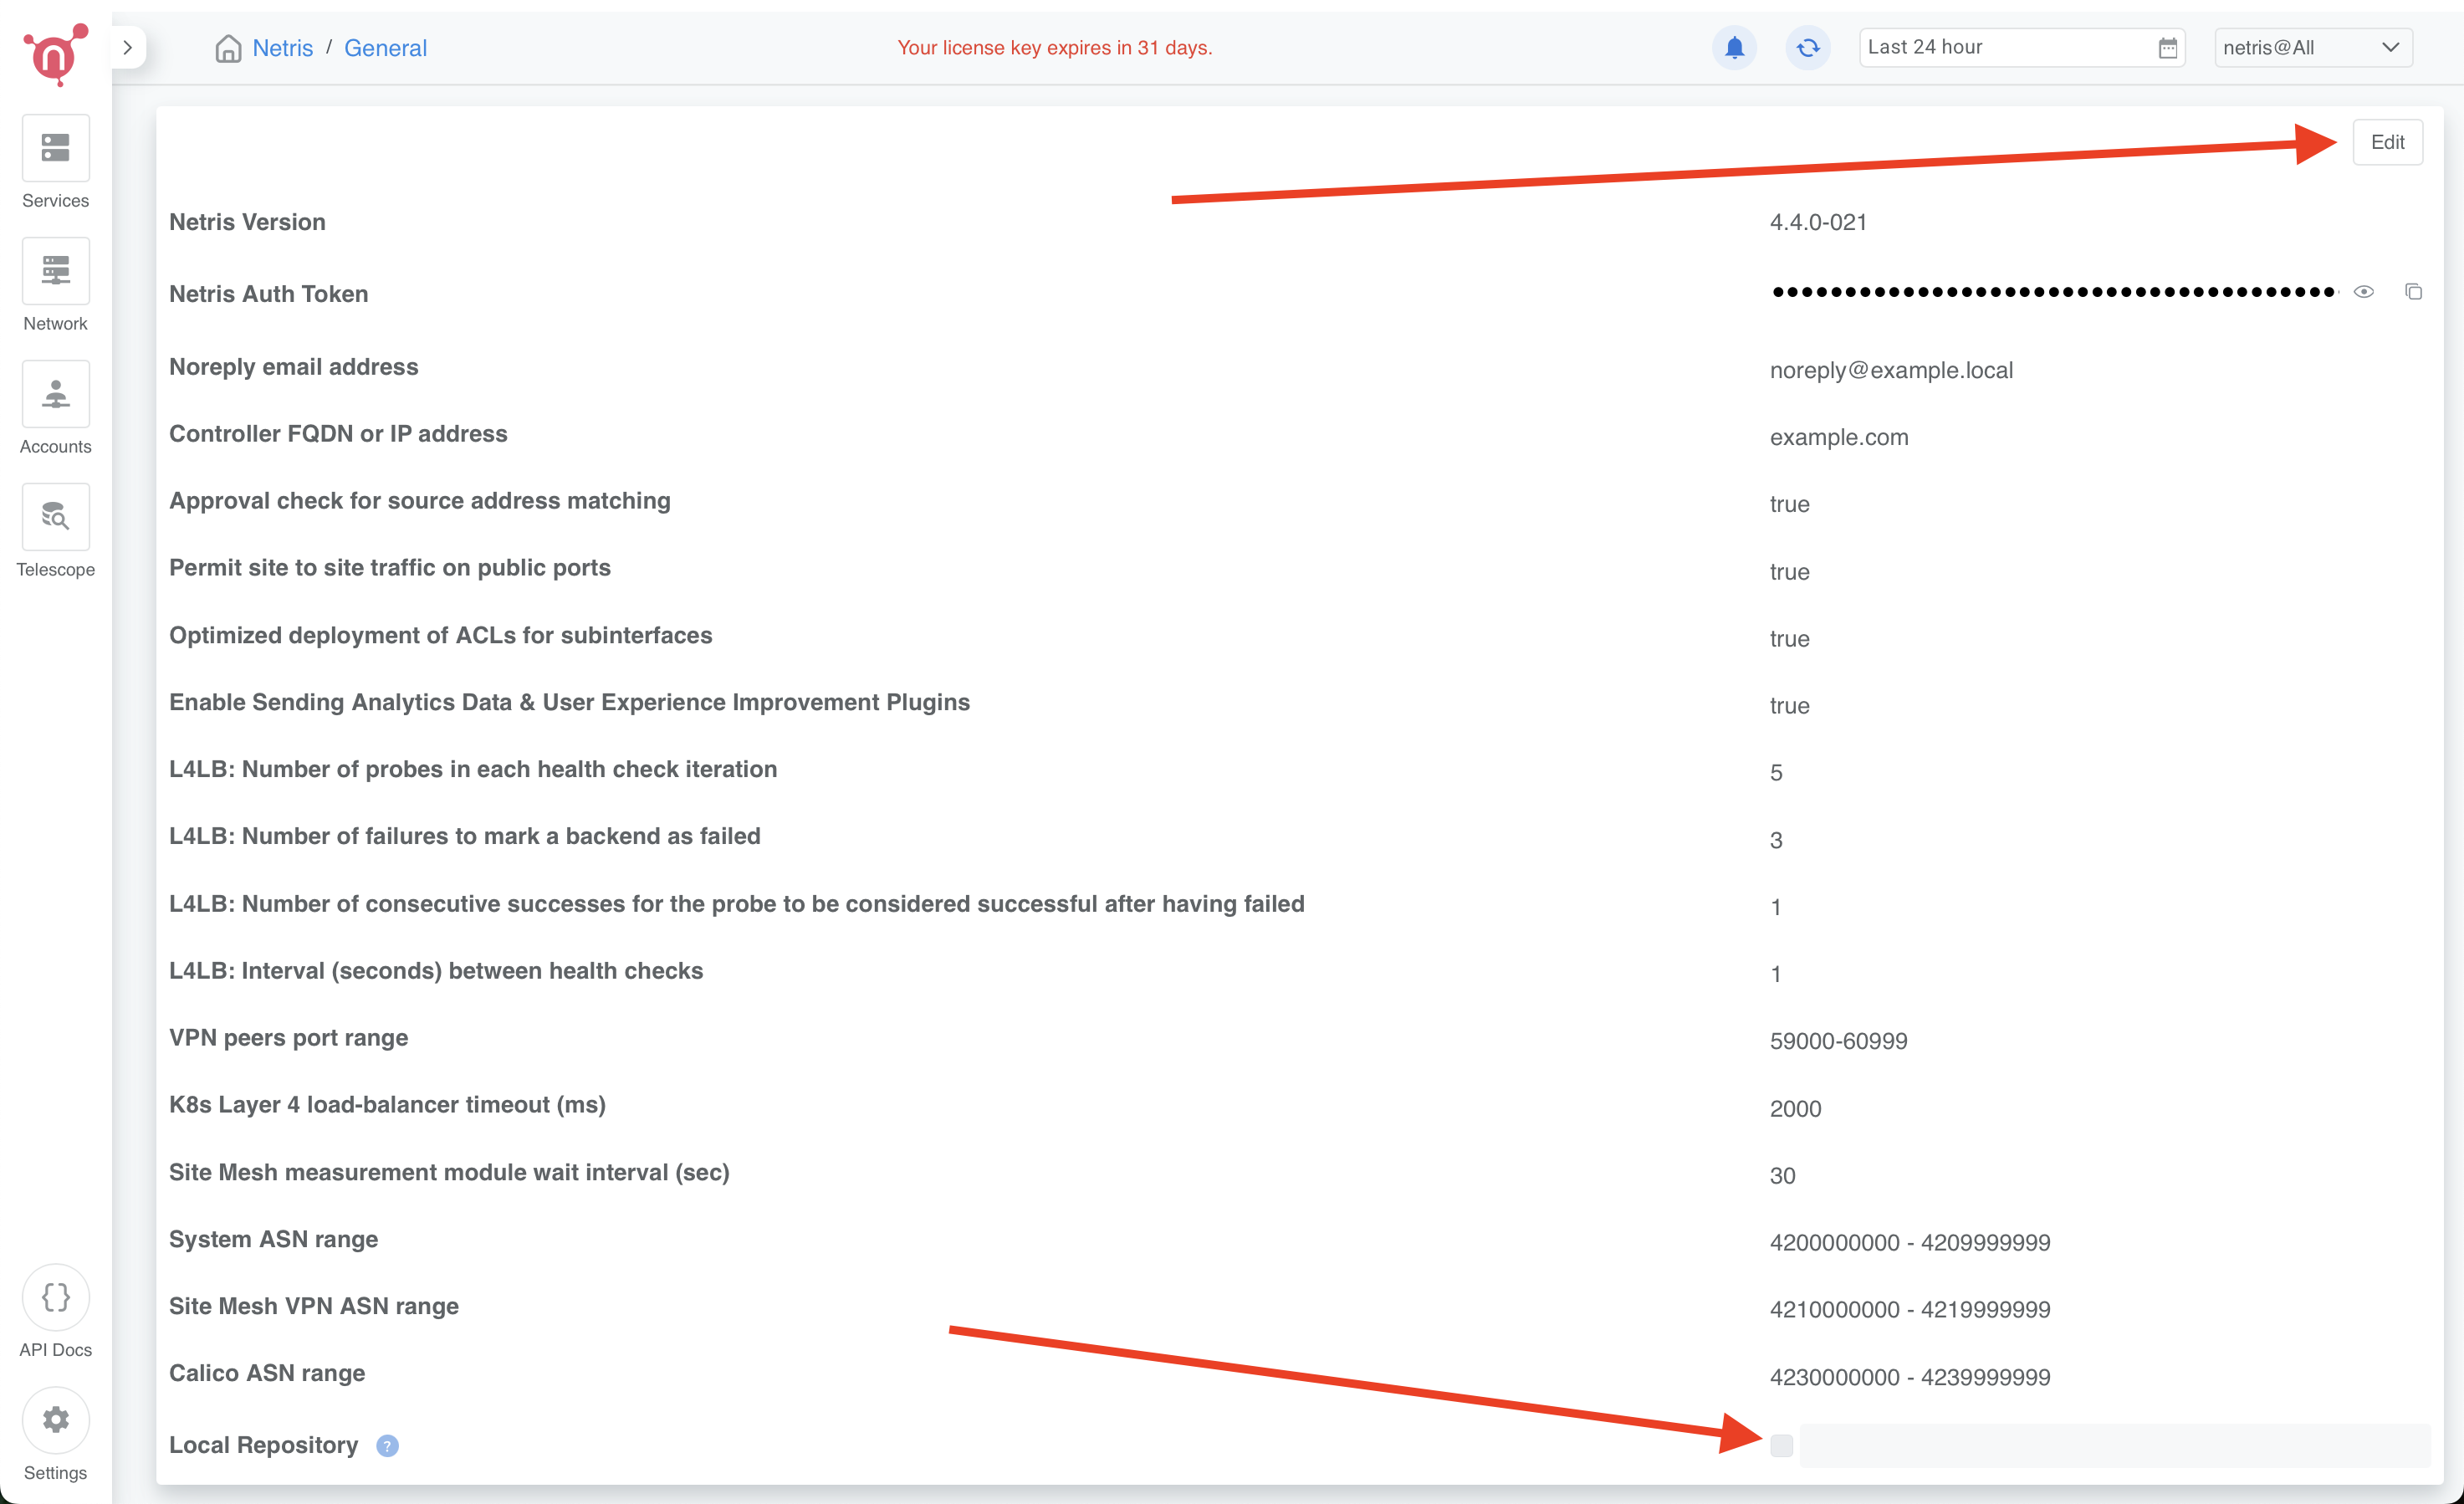
Figure: Local Repository toggle in Settings → General
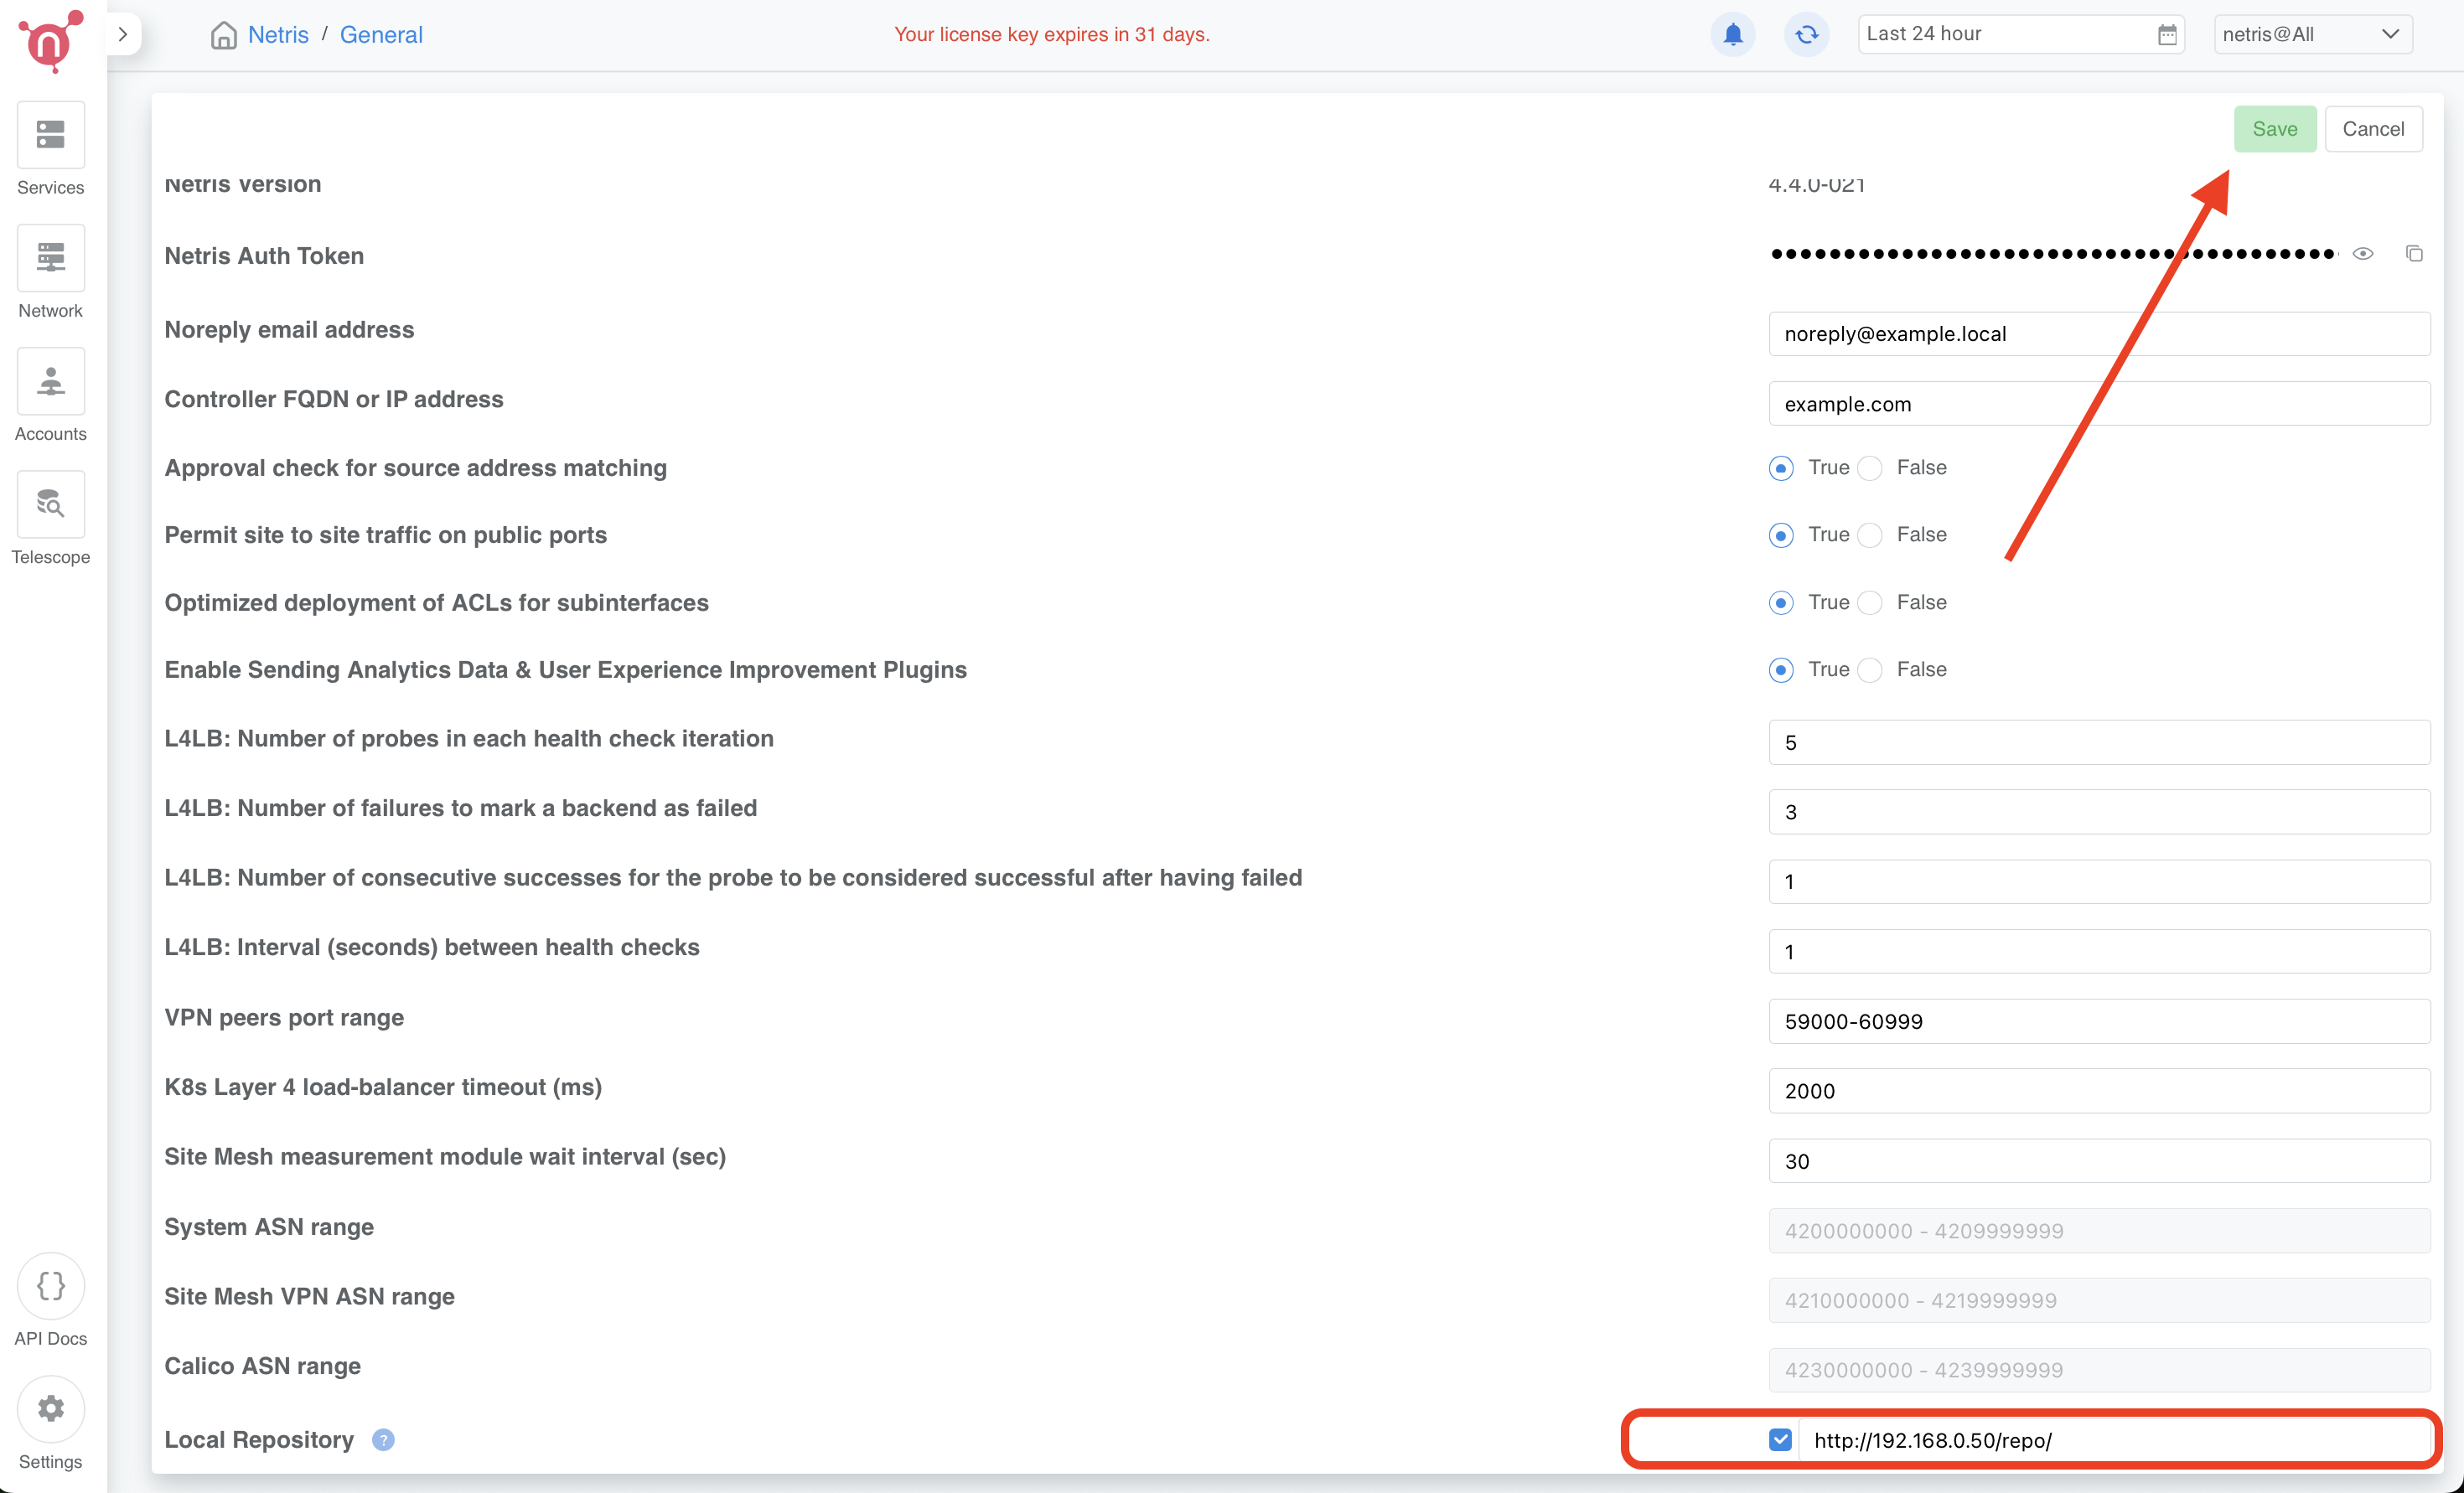
Figure: Saving the Local Repository setting
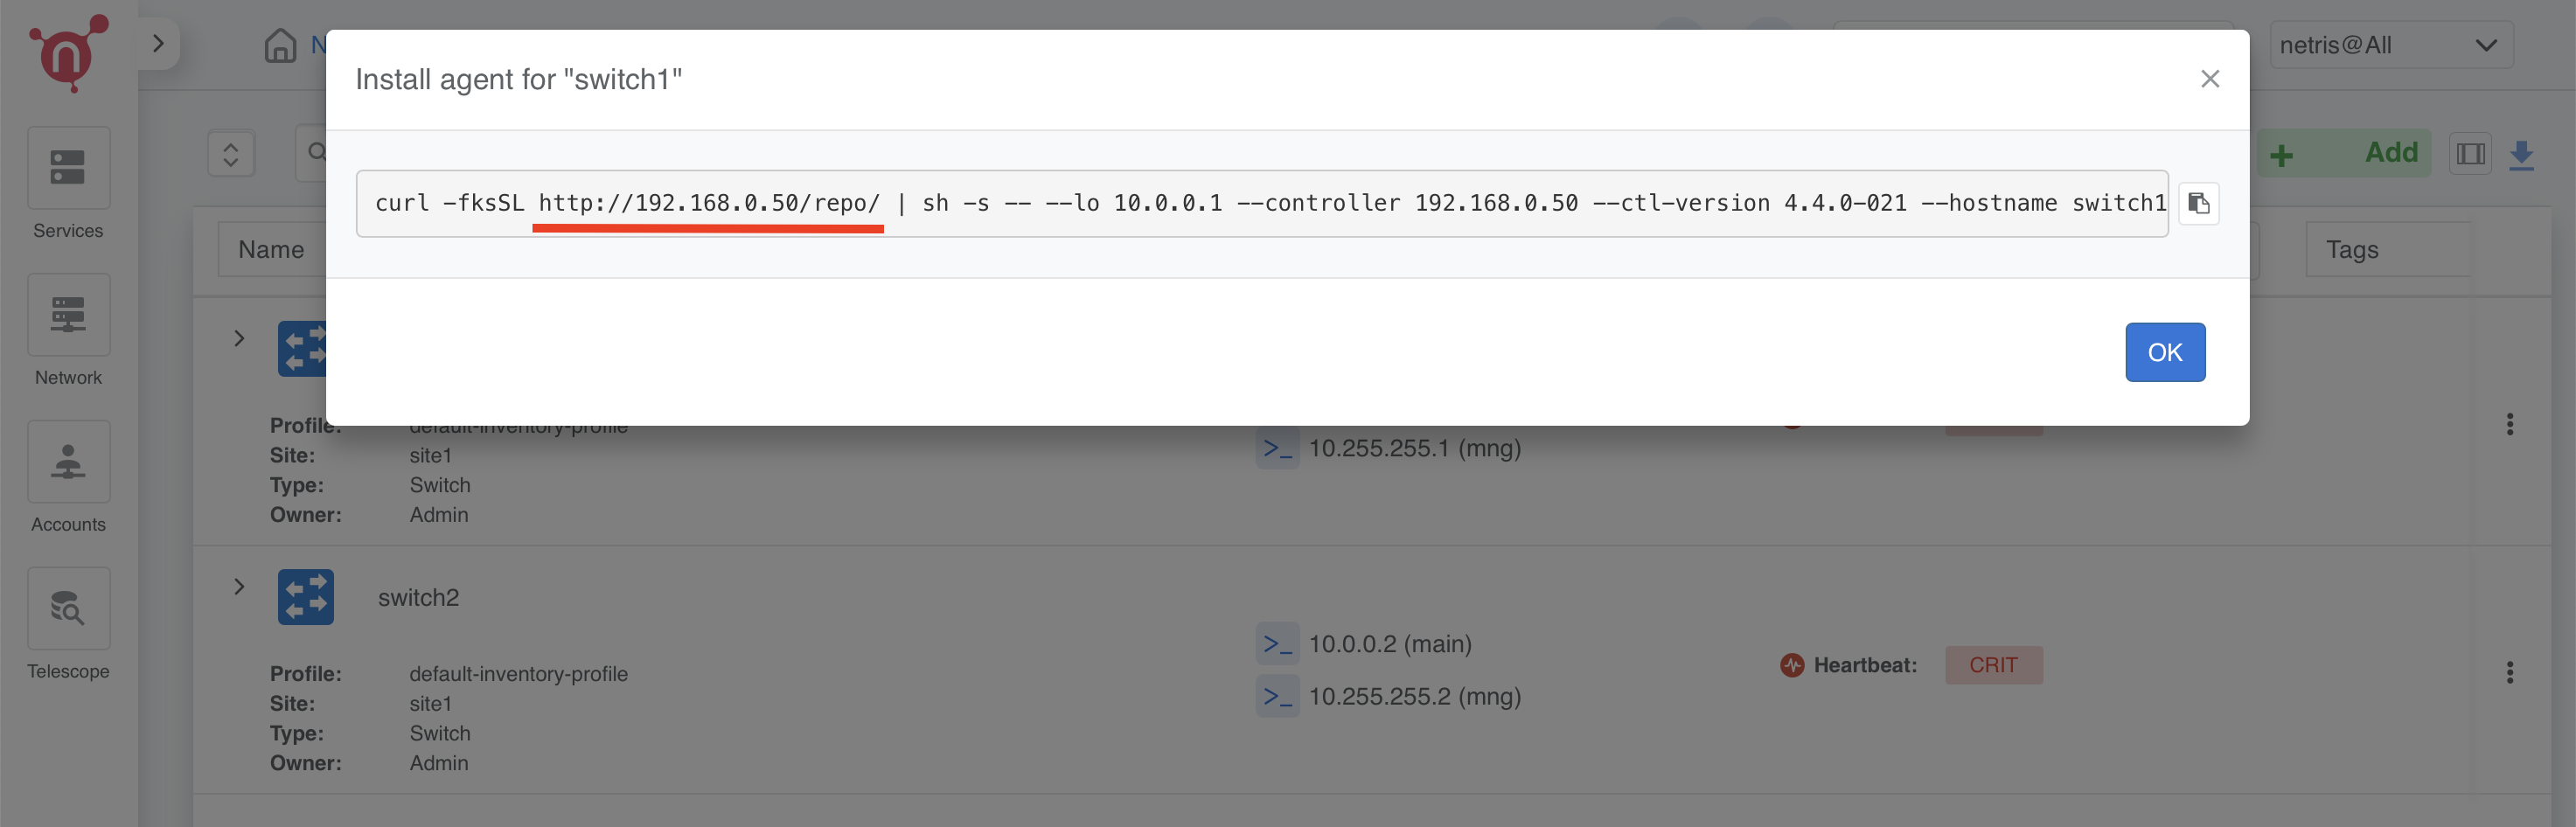
Figure: Agent installation one-liner pointing to the local repository
For issues or additional assistance, contact Netris Support.