 Join Slack
Inventory
The Inventory section allows you to add/edit/delete network switches and SoftGates (VPC gateways). Initial setup of a Netris managed network is a three step process:
Create Inventory Profiles.
Adding Switches.
Adding Softgates.
Note
You can also add new devices in the Topology view.
Adding Switches
Every switch needs to be added to the Netris Controller inventory. You can add new devices with the following process:
Navigate to Network -> Inventory
Click the Add button
Fill in the fields as described below
Click the Add button
Add Inventory Fields - Switch Name
Name of the device
Owner Tenant
Owner tenant of the device (usually Admin)
Description
Description of the device
Type
Select Switch
NOS
Operating system of the device; applicable to switches only
Site
Site where the devices reside
AS Number
Private AS number of the device; recommended to be assigned automatically
Profile
Inventory profile for the current device. Profiles are used for the security hardening of the devices
Main IP address
Main loopback IP address for the device. A subnet with purpose set to loopback needs to be defined in IPAM for the current site
Management IP address
Management IP address for the device. A subnet with purpose set to Management needs to be defined in IPAM for the current site
Switch role
The switch’s role in the fabric hierarchy; must be set for the “Optimize BGP Overlay for leaf-spine topology” feature to work properly
MAC address
MAC address of the device; applicable to switches only (reserved for future use)
Preliminary port count
Used for definition of topology. When the device registers with the controller the actual ports will synchronize with inventory
Initial Break Out
Used for defining the breakout configuration of the front panel ports
EVPN Route Server
Indicates if the switch is designated as an EVPN Route Server. See Inventory Profile documentation for more details.
Add Link
Used for describing physical connections between switches and SoftGates
Example: Add a new Switch.

Note
Repeat this process to define all your switches.
Adding SoftGates
Every SoftGate node needs to be added to the Netris Controller inventory.
The installation process for SoftGate HS is described in the SoftGate HS installation section.
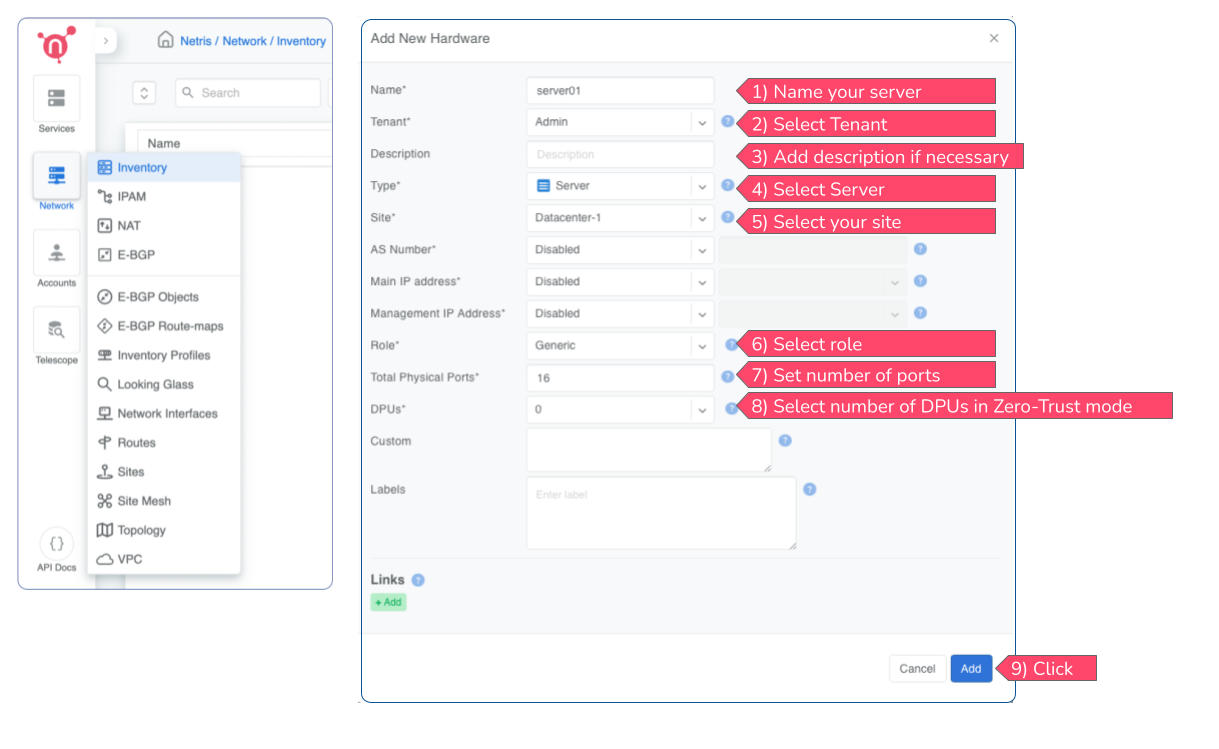
Adding Servers
Every server needs to be added to the Netris Controller inventory. You can add new devices with the following process:
Navigate to Network -> Inventory
Click the Add button
Fill in the fields as described below
Click the Add button
Add Inventory Fields - Server Name
Name of the device
Tenant
Owner tenant of the device (usually Admin)
Description
Description of the device
Type
Select Server
Site
Site where the devices reside
AS Number
Private AS number of the device; recommended to be assigned automatically; applicable to servers with EVPN-VTEP role
Main IP address
Main loopback IP address for the device. A subnet with purpose set to loopback needs to be defined in IPAM for the current site; applicable to servers with EVPN-VTEP role
Management IP address
Management IP address for the device. A subnet with purpose set to Management needs to be defined in IPAM for the current site; applicable to servers with EVPN-VTEP role
Role
Tells Netris whether the server is an agentless generic node (most use cases), or a CloudStack hypervisor, or an EVPN-VTEP (EVPN-on-Host) node.
Total Physical Ports
Total number of physical ports on the server including production interfaces, management interfaces (e.g., iDrac/IPMI), DPU ports including BMC and front panel ports. A typical DGX node has 8 East-West ports, 2 North-South ports, 2 or 3 management ports including BMCs of the server and the DPU. Netris recommends setting this value to at least 16 ports.
DPUs
Quantity of DPUs on the server operating in Zero-Trust mode. Most deployments have 1 DPU per server.
Custom
Custom attributes in JSON format. Typical use cases include supplying East-West host-side IP addressing and routing information, topology validation. This field is also used by the NVIDIA UFM and NMX-C plugins to store additional information such as GUIDs and GPU IDs for the server node.
Labels
Custom metadata that can be used for built-in functions or user-created API automations.
Add Link
Used for describing physical connections between switches, servers, and SoftGates
Example: Add a new Server.
Note
Repeat this process to define all your servers.
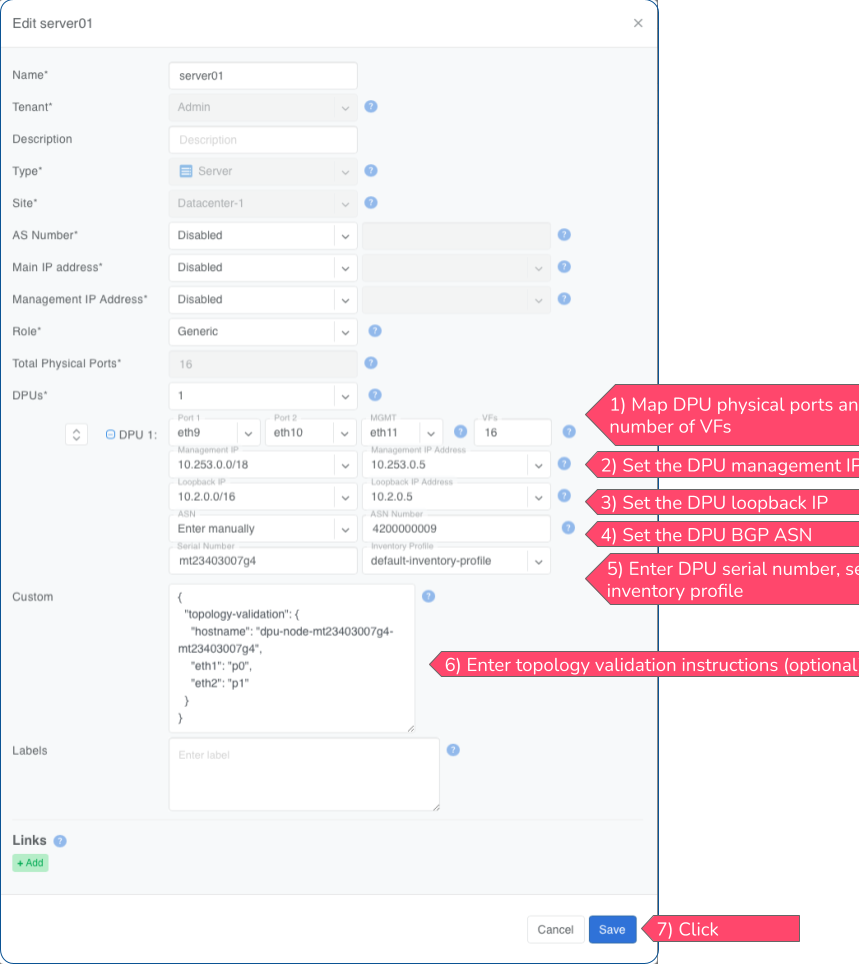
Adding DPUs
Starting with Netris 4.7, you can operate NVIDIA BlueField-3 DPUs. Unlike switches, servers, and SoftGates, DPUs are not standalone inventory objects, but rather a part of the server object. You can find more details about DPU support in Netris in the NVIDIA BlueField-3 DPUs section.
To add a DPU to a Netris server object, add or edit the server object in which the DPU is installed and fill in the DPU fields as described below:
Navigate to Network -> Inventory
Find the server object in which the DPU is installed and click Edit. If the server object does not exist, create it with the process described in Adding Servers section.
Set the DPUs field to the number of DPUs installed in the server and configured in Zero-Trust mode.
Fill in the fields as described below
Click the Save button
Add Inventory Fields - DPU Port 1
Mapping of the first port of the DPU to a modeled server port.
Port 2
Mapping of the second port of the DPU to a modeled server port.
MGMT
Mapping of the BMC port of the DPU to a modeled server port.
VFs
Number of Virtual Functions (VFs) to be created on the DPU. VFs become endpoints in Netris and can be added to Vnets similarly to physical switch ports.
Management IP
Management IP address for the device. A subnet with purpose set to Management needs to be defined in IPAM for the current site
Loopback IP
Main loopback IP address for the device. A subnet with purpose set to loopback needs to be defined in IPAM for the current site
ASN
Private AS number of the device; recommended to be assigned automatically
Serial Number
Serial number of the device; This is the DPU’s unique identifier and is used for the device registration.
Inventory Profile
Inventory profile for the current device. Profiles are used for the security hardening of the devices
Example: Add a new DPU.
Note
Repeat this process to define all your DPUs.
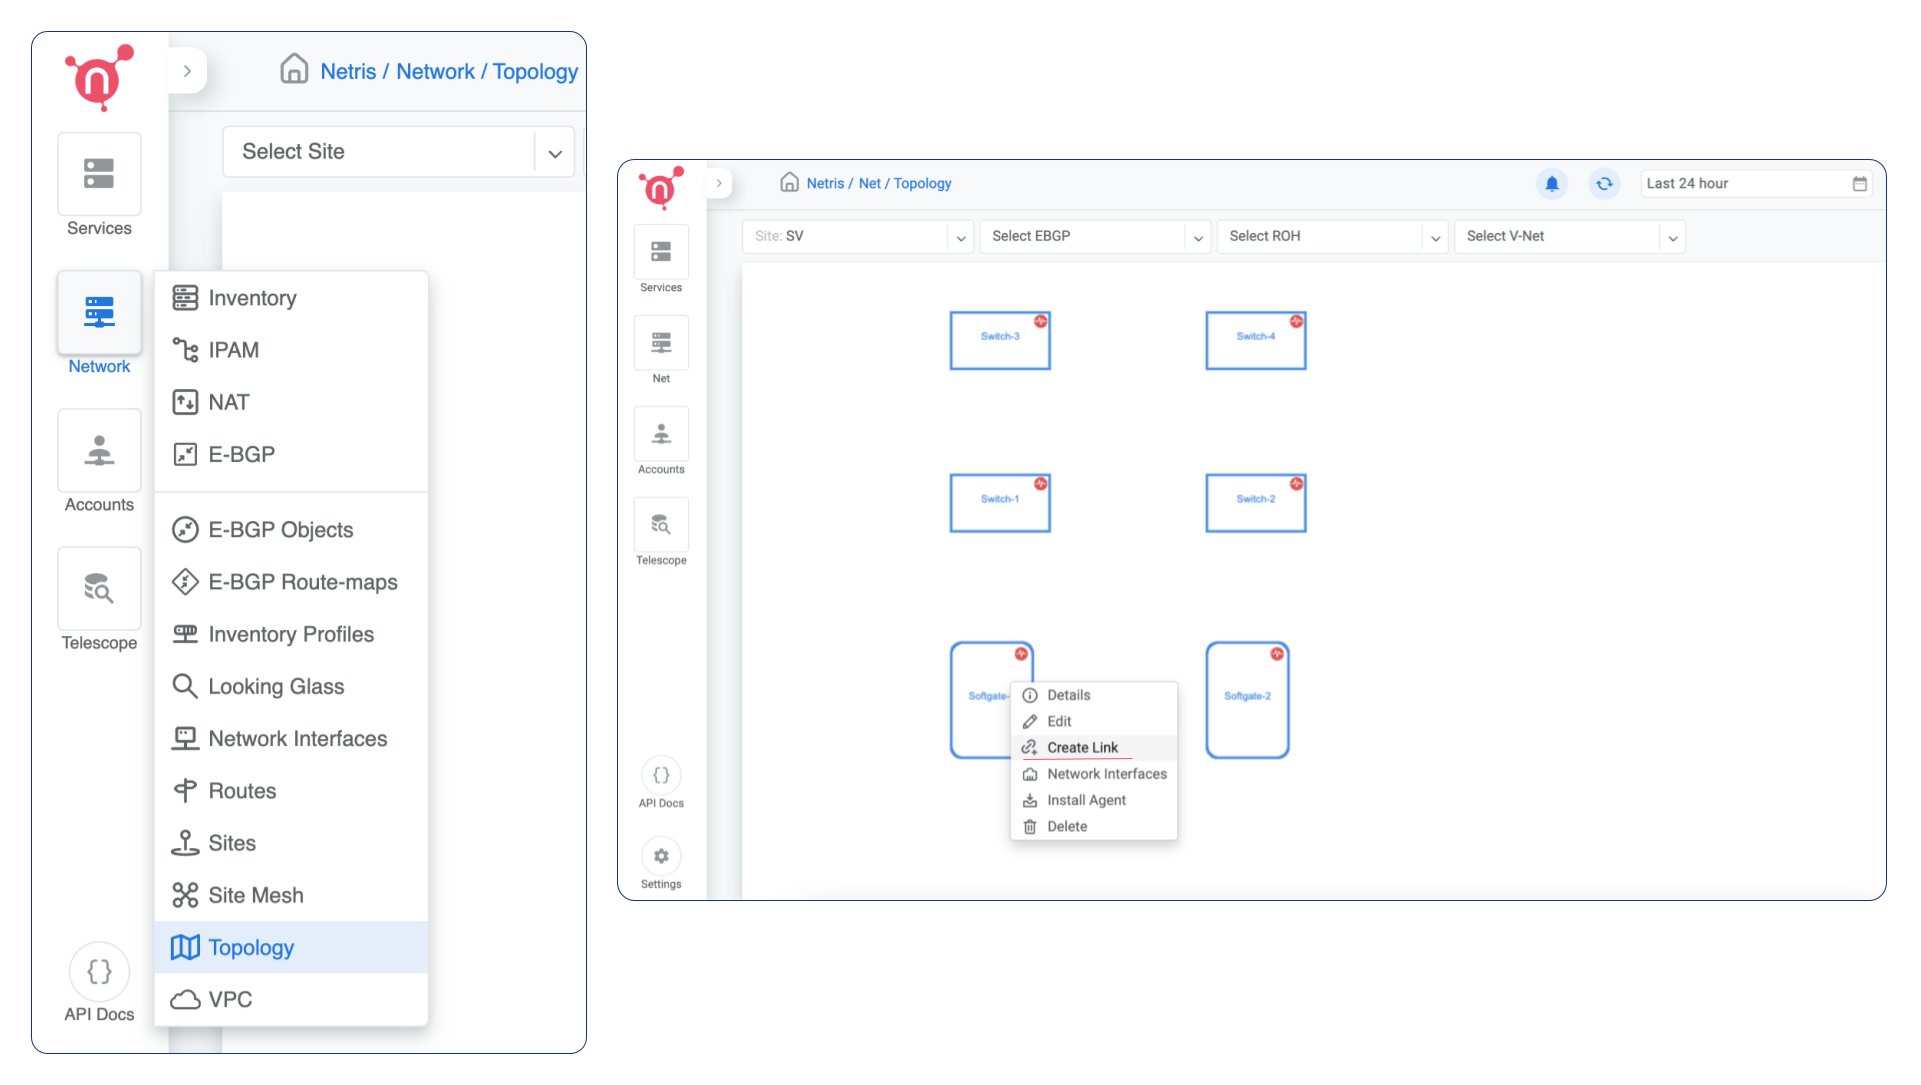
Topology Manager
The topology manager is used for describing and monitoring the desired network topology. Netris Switch Agents software will automatically configure the underlying network devices according to this topology and will watch against potential failures. Wire your switches in accordance with the topology view.
Adding Links
To define the links in the network:
Right-click on the spine switch
Click Create Link
Select the From Port and the To Port
See the example below:
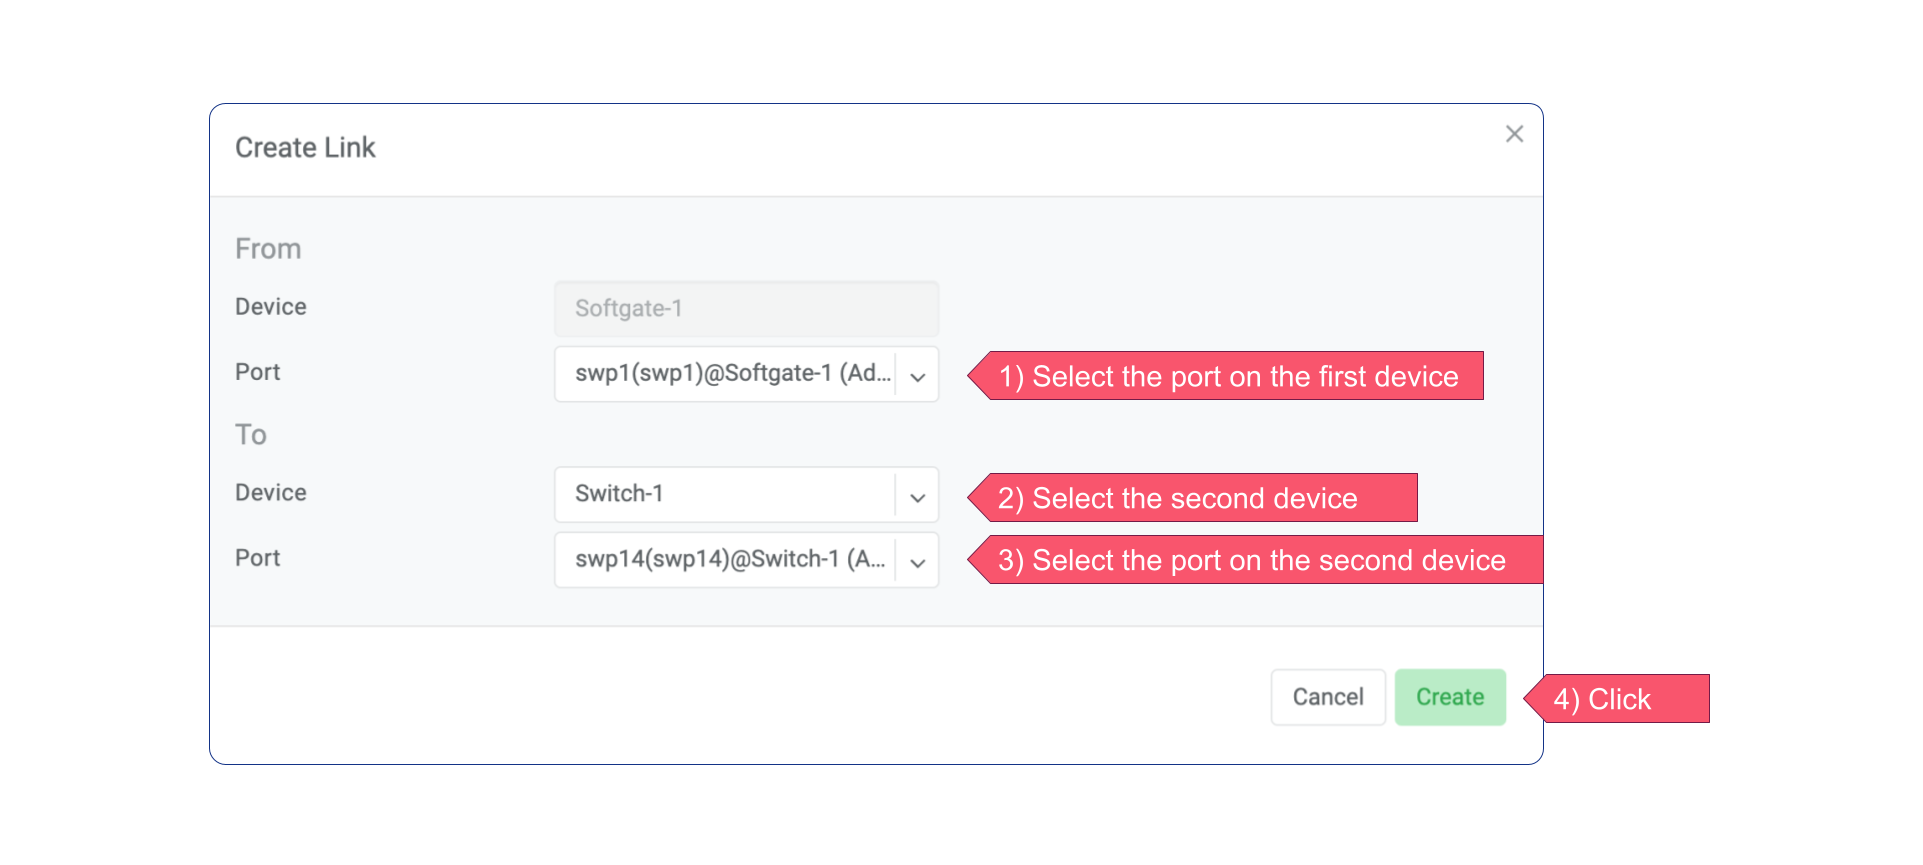
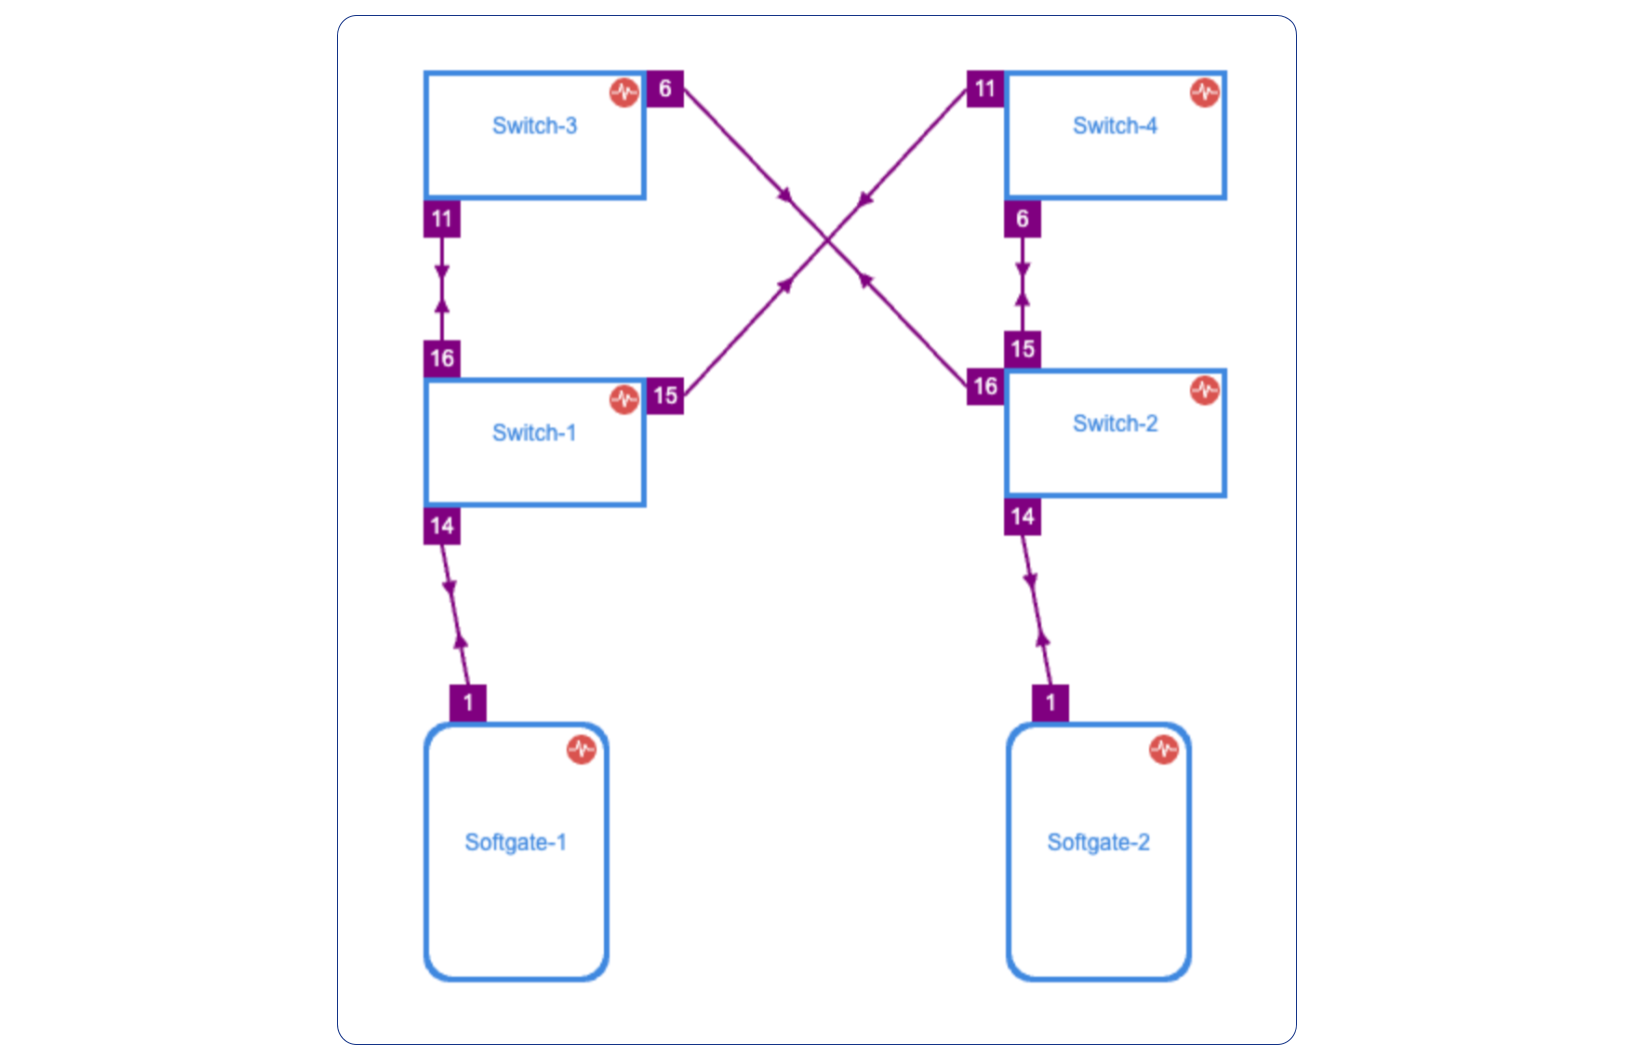
Once the links have been defined, the network is automatically configured as long as physical connectivity is in place and Netris Agents can communicate with Netris Controller.
Tip
You can drag/move the units to your desired positions and click “Save positions”.