 Join Slack
Zero Touch Provisioning
Overview
Netris Zero Touch Provisioning (ZTP) automates the initial configuration and onboarding of Netris-managed switches. Netris ZTP automatically installs the appropriate Network Operating System (NOS) based on the switch make and model, configures management networking, and registers the device with the Netris Controller.
The following diagram demonstrates the ZTP process.

When a new switch is powered on and connected to the management network, it sends a DHCP discover request on its eth0 (management) interface. The Netris ZTP DHCP server responds with the correct IP address and a link to download the appropriate NOS based on the switch’s MAC address found in the discover request. The switch then downloads its NOS image from the Netris Controller local repository, installs it, and registers itself with the controller — all without operator intervention.
Netris ZTP significantly reduces deployment time and eliminates manual configuration errors, especially in environments with many switches to provision.
Prerequisites
To enable ZTP, the following requirements must be satisfied. Complete each item in the order listed.
1. HA Controller with North-South VIP
The Netris Controller must be deployed with a North-South Virtual IP (N/S VIP) configured. The N/S VIP is the address through which switches and other infrastructure devices reach the controller services.
See: Deploy North-South controller VIP
Tip
The N/S VIP is only required when deploying hierarchical (a.k.a. hybrid) Out-of-Band Management network topology. In direct-to-CMN deployments, the controller’s CMN VIP can be used instead, and the N/S VIP is not required. Please, contact Netris Support to learn more about Hybrid and Direct-to-CMN deployments.
2. Configure Netris Local Repository
3. Upload NOS images to the local repo
Identify the directory name where the local repo is located on the controller nodes ($PVC_PATH) as described in the Local Repo installation instructions.
Upload required NOS images to this new subdirectory on each controller node in the HA cluster (substitue <controller_IP> and $PVC_PATH with the appropriate values):
scp cumulus-linux-5.16.1-mlx-amd64.bin <username>@<controller_IP>:/$PVC_PATH/repo/ztp_images/
Tip
The above example command may need to be modified to include the appropriate username and/or port number for your environment.
Furmthermore, the NOS image must be uploaded to the same path on all controller nodes in the HA cluster. This ensures that whichever node is active can serve the NOS image to switches during ZTP.
This method will be improved in future releases to allow uploading through the Netris Controller UI or API, eliminating the need for manual file transfer to each controller node.
4. Controller Management Address IP in Controller Settings
In the Netris Controller web UI, navigate to Settings > General and set the Controller Management Address to the North-South VIP address configured in step 1. This ensures that switches downloading NOS images and packages during ZTP reach the local repository through the controller’s VIP.
By default, the Netris agent installer is downloaded from the Netris public repository. You can optionally enable the Local Repository feature for the Netris agent installer to be sourced directly from the Netris controller.
Tip
If you use FQDN instead of the IP address in the Local Repository URL, ensure the DNS servers configured in the application inventory profiles can resolve the controller’s FQDN to the controller’s N/S VIP.

Warning
ZTP Network Scope: In this version of Netris ZTP, the DHCP server can service either the seed switches (connected to the CMN) or non-seed switches (connected via the management V-Net), but not both simultaneously.
Recommended Workflow
To provision all switches in a deployment, follow this two-phase approach:
Phase 1 — Seed switches (CMN): Set the Controller Management Address to the controller’s CMN IP address. Power on and provision all seed switches first.
Phase 2 — Remaining switches (Management V-Net): Once all seed switches are provisioned, update the Controller Management Address to the controller’s N/S VIP address instead. Then power on and provision the remaining switches (OOB switches, leaf switches, etc.) whose management ports connect to the seed switches or other OOB switches.
5. IPAM Subnets in the Management VPC
Tip
Netris automatically configures ZTP for any subnet in IPAM with Purpose set to “management”.
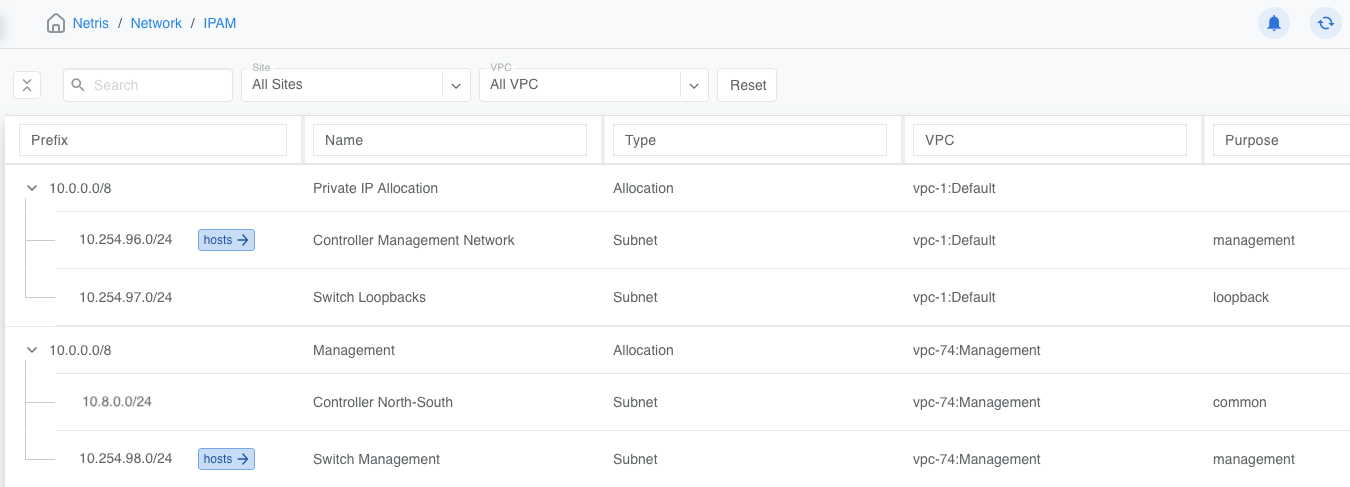
A typical Netris deployment includes at least two “management” subnets: one for all Netris-managed switches and one for the initial set of “seed” switches.
The above screenshot demonstrates this configuration.
10.254.96.0/24is the subnet for the “seed” switches (attached to the System VPC)10.254.98.0/24is the subnet for all other Netris-managed switches (attached to the Management VPC)
If your Netris deployment includes a dedicated subnet for the controller’s North-South VIP, this subnet should also be created in the IPAM.
Tip
The Controller Management Network is a physically separate, statically configured, non-Netris-managed management network. It connects Netris Controller nodes (for HA communication) and seed switches (in hierarchical deployments) or OOB switches (in direct-to-CMN deployments).
Tip
Seed switches — the initial set of 2 to 6 Netris-managed switches provisioned before any other switches in hierarchical deployments — have their management ports connected directly to CMN.
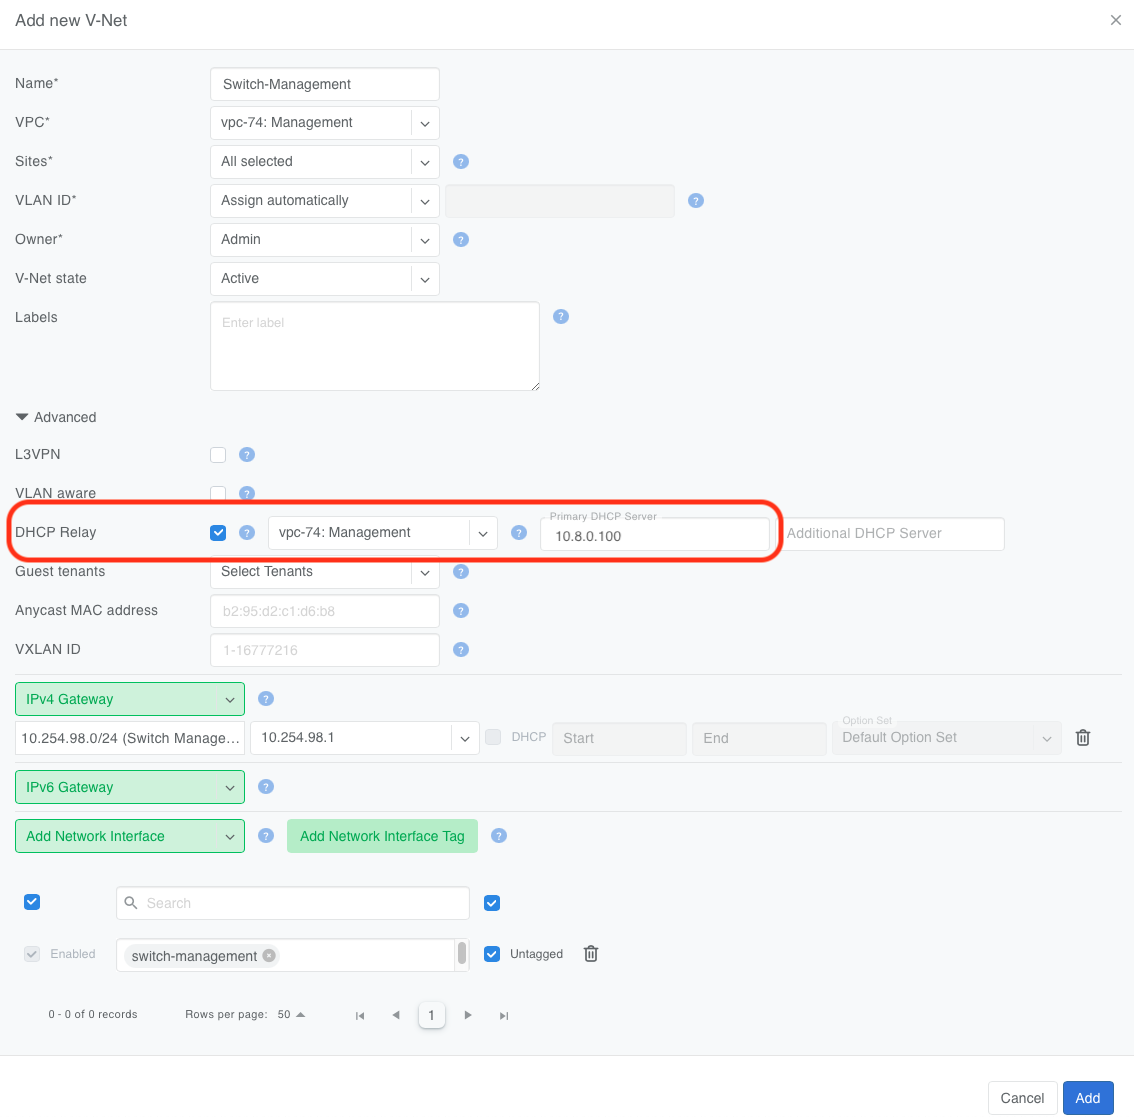
6. V-Net with DHCP Relay
If the Netris-managed switches are in a different VNet from the controller’s North-South VIP, then configure a DHCP relay in the switch management VNet, pointing to the Netris controller’s North-South VIP address. This ensures that DHCP requests from switches on the management V-Net are forwarded to the ZTP DHCP server running on the Netris controller.
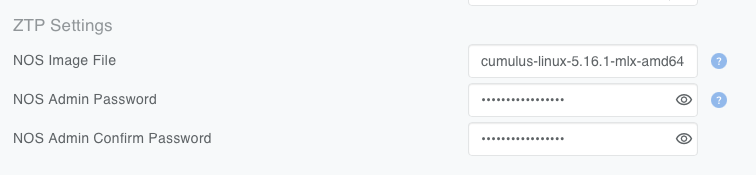
7. Inventory Profile Configuration
Each inventory profile used for ZTP must specify the following:
NOS Image — the network operating system image file that ZTP will install on the switch.
NOS Admin Password — the administrative password Netris will configure on the switch after provisioning is complete.
8. Switch MAC Address in Inventory
The MAC address of each switch must be populated in the corresponding switch object within the Netris inventory. The MAC address must be that of the eth0 interface of the switch. This is the address the switch uses during its initial DHCP discover, and it is how the ZTP server identifies which NOS to assign.
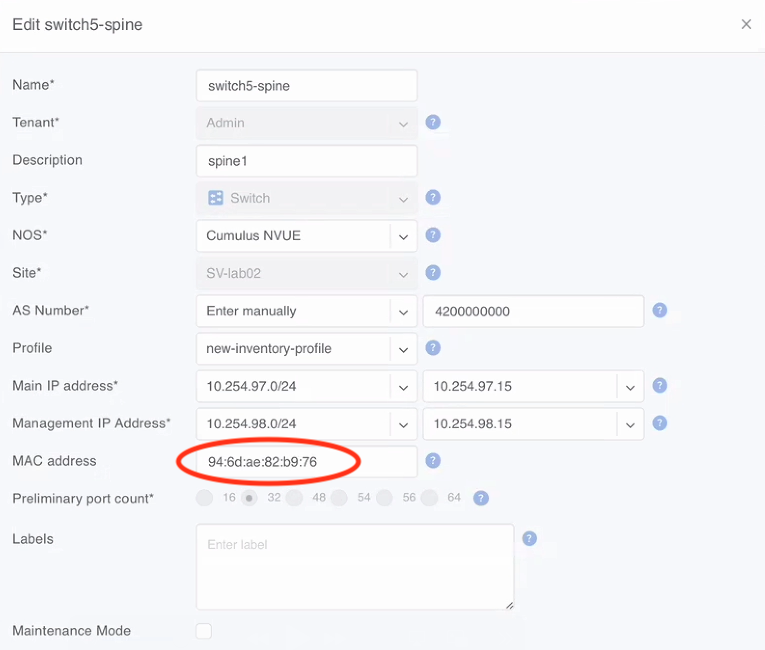
Where to Find the MAC Address:
Switch chassis label — a sticker on the front or rear of the switch, typically near the serial number.
Original packaging — the shipping box label includes the MAC address alongside the part number and serial number.
9. Configure Static Routes on the Controller Nodes
The controller nodes need static routes so they can communicate with the management V-Net subnet through the N/S interface. Without these routes, the controller cannot reach the switches on the management network.
On each controller node, edit the Netplan configuration file at /etc/netplan/50-cloud-init.yaml to add the required routes.
Example Netplan Configuration
In this example, the controller has two interfaces:
ens3— the primary interface with the default gateway.ens8— the N/S VIP interface, used to reach the management networks.
network:
  version: 2
  ethernets:
    ens3:
      addresses:
        - "10.254.96.130/24"
      nameservers:
        addresses:
          - 8.8.8.8
        search:
          - netris.local
      routes:
        - to: "default"
          via: "10.254.96.1"
    ens8:
      addresses:
        - 10.8.0.100/24
      routes:
        - to: 10.254.97.0/24
          via: 10.8.0.1
        - to: 10.254.98.0/24
          via: 10.8.0.1
In this example, 10.254.98.0/24 is the management subnet where the switches’ management ports reside. 10.254.97.0/24 is a prefix from which the switches’ loopback IPs are allocated. The routes point to the appropriate next-hop gateways reachable through the ens8 interface.
After editing, apply the configuration:
sudo netplan apply
Note
Repeat this step on all controller nodes in the HA cluster. Each node must have the same routes so that whichever node is active can reach the management networks.
10. Deploy the Netris ZTP DHCP Server
The Netris ZTP DHCP server is deployed as a Kubernetes workload on the controller cluster, following the same pattern used for other controller services (e.g., the local repository). The manifest is located at:
manifests/netris-controller/ztp-dhcp-server.yaml
Deploy the ZTP DHCP server by applying the manifest from the first controller node without modifying it:
kubectl apply -f manifests/netris-controller/ztp-dhcp-server.yaml
Expected output:
deployment.apps/netris-ztp-dhcp-server created
Verify the DHCP server pod is running:
kubectl -n netris-controller get pods -l app.kubernetes.io/instance=netris-ztp-dhcp-server
11. Verify ZTP Readiness
After deploying the DHCP server, confirm the following:
The ZTP DHCP server pod is in a Running state, which can be seen in the Dashboard.
The controller nodes can reach the management subnets (verify with ping from a controller node).
Switch MAC addresses are populated in the Netris inventory.
The inventory profile has the NOS image and the admin password configured.
Once everything is confirmed, power on the switches. They will automatically perform a DHCP request, receive their configuration from the ZTP server, download and install the NOS image, and register with the Netris Controller.
How ZTP works (Process Summary)
For reference, here is the sequence of events that occurs when a switch is provisioned via ZTP:
The switch powers on with no configuration and sends a DHCP discover on its eth0 (management) interface.
The ZTP DHCP server matches the DHCP request to a switch object in Netris using the source MAC address.
The server assigns the correct management IP address and provides boot parameters, including the URL of the NOS image on the local repository.
The switch downloads and installs the NOS image.
After installation, the switch reboots into the new NOS, initiates the ZTP process, which configures the admin credentials from the inventory profile, downloads the Netris switch agent, and establishes a connection to the Netris Controller.
The switch appears as provisioned in the Netris inventory and begins receiving its intended network configuration.
Troubleshooting
If a switch does not provision as expected, check the following:
DHCP server logs: Check the ZTP DHCP server pod logs for DHCP discover/offer/request/ack messages.
kubectl -n netris-controller logs -l app.kubernetes.io/instance=netris-ztp-dhcp-server
MAC address mismatch: Verify that the MAC address in the Netris inventory matches the eth0 MAC address printed on the switch.
Network reachability: From a controller node, ping the management subnet gateway to confirm the static routes are in place.
DHCP relay: Confirm the V-Net DHCP relay is pointing to the correct N/S VIP address.
Controller Management Address: Ensure the Controller Management Address in controller settings is set to the N/S VIP (or CMN VIP if appropriate).
NOS image the admin password: Verify the NOS image name in the Inventory Profile matches the NOS images uploaded to the local repo.
For additional assistance, please contact Netris Support.